I could end my review there — my take on Ernest Hemingway’s six-word story, “Baby Shoes.” But I’m not Hemingway. All I’m saying is everything that’s good, bad, and in-between about the Band 7 can be traced back to its absurdly cheap price.
Usually, when I buy something this cheap, I’m expecting a lot of tradeoffs. Something that makes me go, “A-ha! That’s why it’s $50.” (Technically, it’s actually $49.99, but let’s not quibble over a penny.) And yes, I had a few of those moments while wearing the Amazfit Band 7 these past few weeks. But as with the $99.95 Fitbit Inspire 3, wearing the Band 7 felt like stepping through a portal to the early days of wearable tech — and it made me realize how rare fitness bands are nowadays.
It makes sense. The line between fitness bands and smartwatches grows ever blurrier, to the point I often wondered during testing if anyone would miss fitness bands if they were to completely disappear. The jury is still out on that one, but it led me to another question. Where did all the budget fitness trackers go?
It’s not a looker, but it’ll do
No one is going to compliment you for wearing the Amazfit Band 7. I doubt anyone would even give it a second glance unless it’s to ask, “Oh, is that a Fitbit?”
I mean, look at this thing. It doesn’t help that black is the most boring color for a gadget, but stylish or distinctive, this is not. There are other color options, like pink and beige, but they’re only interesting in that they’re not black. This is the tracker for utilitarians who purse their lips at premium design flourishes, thinking, “Why would I need any of that?”
The default strap is a bit stiff, but nothing feels like it’s about to fall apart. (It does tend to collect dead skin and dust, however.) The whole thing feels a bit plasticky, but that’s perfectly fine because that’s what you sign up for with a $50 tracker. The Band 7 is light at 28g and is comfortable enough to wear to sleep. It’s “heavier” than the Inspire 3’s 17.7g, but I doubt most people would be able to tell the difference.
The colorful watchface adds a pop of color and personality to the otherwise bland Amazfit Band 7.
It is, however, almost impossible to put on one-handed. I had to brace it against a table to stop it from sliding around my wrist when trying to secure the strap. I suspect this is a problem exclusive to the Tiny Wrist Club, but even when I did get it on, it was still too loose. I had to wear it further up my arm for a good fit as I was on the smallest hole already.
The good news is it’s easy to swap out straps. Like the Garmin Vivosmart 5, there aren’t any pins. You just pop the tracker out. The bad news is you need to get a strap specifically for the Band 7, which mostly limits your options to other colors. I did, however, find this snazzy third-party strap on Amazon for about $13.
The nicest thing about the Band 7 is its 1.47-inch OLED display. The bezels are smaller than its predecessor, and everything on the display looks bright and colorful. Notifications are easy to read, and I had an easy time swiping through menus. Surprisingly, the new watchfaces are cute as well. I was particularly fond of the one you see in these review photos. It added a pop of color and fun that’s missing from the overall design. For the data nerds, there are other watchfaces that’ll display the stats you crave — and those aren’t too bad looking, either.
I’m not a fan of this enclosure. It’s very hard to secure one handed, especially if you have smaller wrists.
And OLED doesn’t totally destroy battery life. The Band 7 lasted a little over two weeks on a single charge, with the always-on display enabled about a third of that time. Be careful, though, as it comes with a proprietary charger. Don’t be like me and forget where you stashed it because you didn’t need it for so long. I swear I stuck it in my work bag, but I can only conclude it fell through an interdimensional portal to the great e-waste graveyard in the sky. At least replacing the charger isn’t quite as bad as with other devices. An extra charger costs $9.99 from Amazfit itself, but you can find a better deal so long as you’re okay rolling the dice with third-party accessory makers on Amazon.
What $50 gets you in 2023
If you’ve never heard of Amazfit, you only really need to know one thing about its wearables. They pack a metric crapton of features at prices that probably leave Fitbit executives gnashing their teeth.
For instance, here’s a list of the Band 7’s main features:
Amazon Alexa
Continuous heart rate, blood oxygen, and stress tracking
Sleep tracking with sleep stages, sleep scores, and breathing quality
Training metrics like VO2 Max, recovery time, training load, and training effect
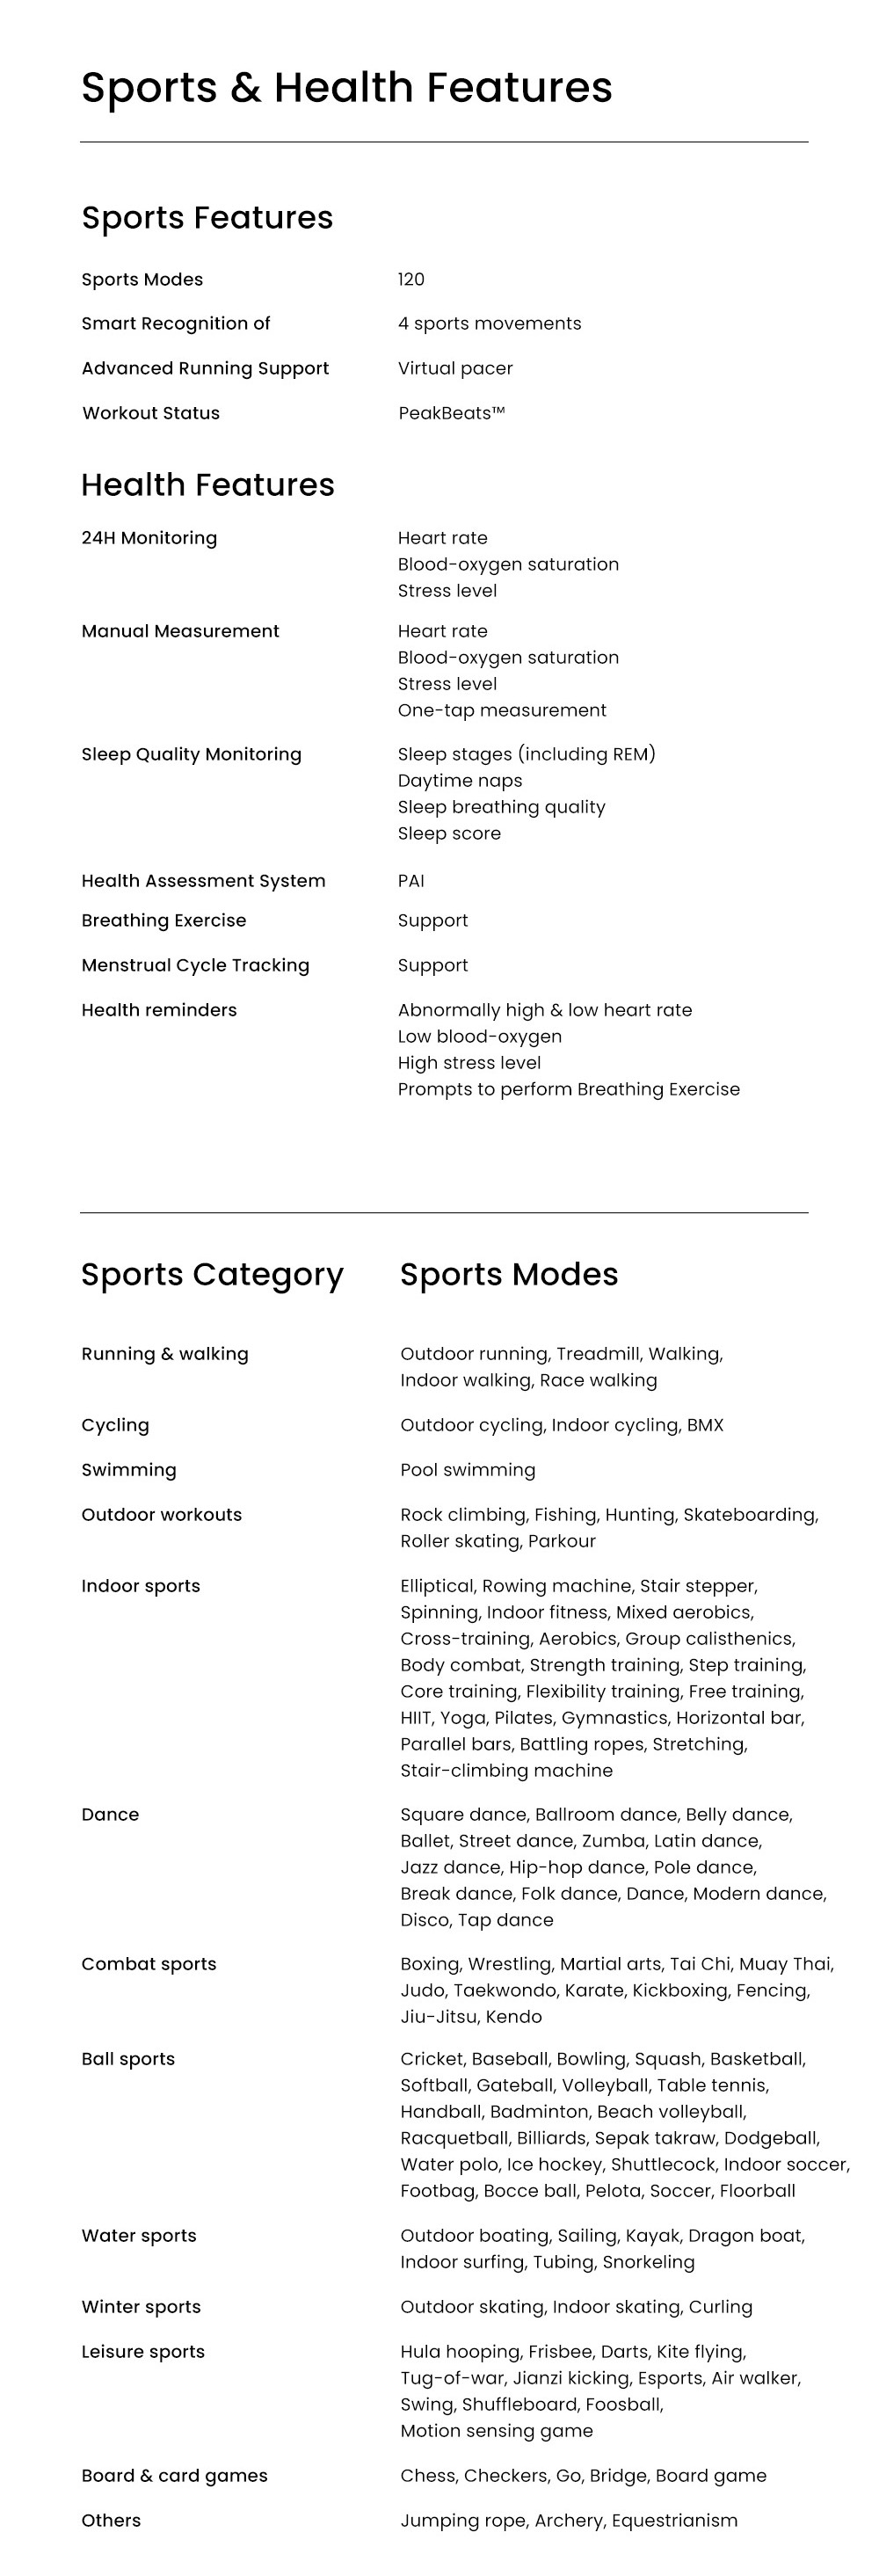
120 sports profiles, which somehow include parkour, folk dancing, and chess. Yes, chess.
Menstrual cycle tracking
Push notifications, quick replies (Android), find my phone, camera remotes, alarms, timers, and even a Pomodoro timer
Media controls
Stress tracking is still relatively new and not something I expected to see on a tracker this cheap.
Generally, I don’t expect to see these types of training metrics on something under $180 these days unless it’s on sale. I really don’t expect to see abnormal heart rate notifications for under $100. And you get a good level of accuracy for all the basic health metrics. (I can’t say much about the abnormal heart rate and SpO2 alerts other than that I never triggered them.) These features, combined with the OLED display and longer battery life? Pfft. Paying $50 for this feature set feels like you’re getting away with something.
There are a few things that will remind you that this is a budget device, however. The Zepp app — Amazfit and Zepp share a parent company and companion app — isn’t as polished as what you’ll find on bigger-name brands. There are quirks. For instance, it would be great if Zepp could figure out how to make switching to Imperial units stick 100 percent of the time. It’s also overly generous to call Zepp’s 10 mini apps an ecosystem, as its site claims. Occasionally, you have to reconnect with GPS satellites before an outdoor workout, or your data will be wonky. (You’ll be notified before starting, however.) But the app is uncluttered, simple to navigate, and gets the job done.
The features that are missing feel more like sensible compromises than glaring omissions. There are no NFC payments, for example, and it uses your phone’s GPS instead of having its own built-in sensors. And while you can talk to Alexa, there’s a tiny lag, and there’s no speaker, so you have to read whatever its responses are. (Not a terrible loss, however, if you find Alexa annoying.)
Navigating through menus is a breeze, and text is easy to read.
In my day-to-day, I wouldn’t say the Band 7 went above and beyond my expectations. That said, it did exactly what I wanted it to. It told me when to take a break from sitting, notified me when texts came through, and occasionally urged me to chill out. It’s such a lightweight device I often forgot I was even wearing it. As with the GTR 4, I made most use of the Pomodoro timer while puttering around doing chores. It’s not a glamorous device, but it’s not meant to be. Sometimes, it’s a relief to use a device that doesn’t aspire to be more than it is.
Casual activity, not training
The Band 7 is best for people who want to move more. I most enjoyed using it for activities like walking, yoga, and bodyweight strength training. Those are the kinds of exercises where I’ll maybe glance at my wrist to check duration or heart rate. That’s perfect since the display isn’t going to show you as much as a larger smartwatch would, anyway. As for accuracy, metrics like step count and heart rate were right on par with other devices I tested during the same period, including the Apple Watch Ultra and Garmin Forerunner 265S.
I’m also a big fan of Amazfit’s PAI system. It gives you an indicator of whether you’re getting enough activity by measuring how many PAI points you get over the course of a week. You earn PAI by raising your heart rate. I go more in-depth into PAI in my Amazfit GTR 4 review, but the gist is it’s a more holistic and beginner-friendly approach to getting your recommended 150 minutes of moderate exercise per week.
You won’t see a ton of data on any one given screen, but that’s alright for casual activities.
I’m very much a fan of Amazfit’s PAI system of evaluating your weekly activity. It’s great for beginners or anyone with busy schedules.
That said, I’d never use this to prep for my next race. If I’m going to torture myself with 12-16 weeks of training, I want more precise GPS data than a tethered device can give me. On a 3.03-mile run recorded by my iPhone, it only logged 2.45 miles, while the Apple Watch Ultra logged 3.01 miles. That, in turn, threw off metrics for pace and VO2 Max. (Though some of this was due to a delay in the Band 7 acquiring a GPS signal.) That’s okay for short, casual runs (e.g., 1-4 miles), but it’s not what I wanted during the home stretch of my half-marathon training. Between the Forerunner 265S and the Band 7, you can guess which one I left on my nightstand on race day.
Where have all the fitness bands gone?
These days, there are more smartwatches than fitness bands. That wasn’t always the case. It used to be that I could list several sub-$200 fitness bands off the top of my head. There was the Misfit Ray and Shine, the Fitbit Alta HR (and most Fitbits before the Blaze), the Jawbone UP, and Samsung Gear Fit 2. But aside from the Amazfit Band 7, I can only name a handful of other fitness bands that have come out in the past year — the nearly identical $49.99 Xiaomi Mi Band 7, the $99.95 Fitbit Inspire 3, and the $149.99 Garmin Vivosmart 5.
And now that I think of it, it’s odd.
We have budget phones, laptops, speakers, TVs, and headphones — and I suspect my peers in these categories could probably name more than three from reputable brands that came out in the last year. There are several reasons I can think as to why that is, but the fact is companies are prioritizing premium flagship smartwatches at the expense of affordable, simple fitness trackers. I’m sure profit margins have something to do with it, but it’s a shame.
Photo by Amelia Holowaty Krales / The Verge
Affordable fitness bands like this aren’t as common as they used to be.
But perhaps I’m wrong. Maybe this is people voting with their wallets. Maybe fitness bands have had their time, and the vast majority of people don’t find the savings or extra battery life worth it. I somehow doubt that. And even if it were true, that doesn’t negate the need for good budget options. Whatever you think of wearable tech, fitness trackers can be a motivational tool to improve your health or stay connected without staring at your phone 24/7. You shouldn’t need to pay $200 or more for that if all you want are the very basics.
I nearly bought a Framework Laptop, but logistical realities got in the way
Photo by Becca Farsace / The Verge
“My old Dell XPS 15 has gotten sluggish. The battery dies easily. It’s heavy to cart around, anyhow. Now that I’m going out in public again, I need a new work machine.”
These were the thoughts circling my head at yesterday’s Framework event — where the company known for its easily-upgradable laptops announced new chips and a new, longer-lasting battery. “Battery life has consistently been the main negative for the Framework laptop,” said CEO Nirav Patel, hitting on the one reason I’d only ever admired the company’s laptops from a distance. This morning, without that one reason to hold back, it was time to put down a $100 deposit for my own Framework Laptop 13.
But I didn’t — because Framework wouldn’t sell me that battery unless I bought more components than I needed.
Screenshot by Sean Hollister / The Verge
Even in the “DIY Edition”, you have to pay $320 extra. A prebuilt with the 61Wh battery costs $420 extra but also doubles your memory and storage.
See, while the Framework Laptop 13 starts at $1,049, or $849 for a barebones kit, that model only comes with the old 55Wh battery alongside a Core i5 or Ryzen 5 chip. To get the 61Wh battery inside, Framework makes you spend at least $320 more for a Core i7 or Ryzen 7 instead. Or, I could additionally buy a 61Wh battery to swap into the machine for $69 and have the 55Wh battery sitting around turning into e-waste.
I couldn’t understand it. This is the company that prides itself on modularity, the one that told me yesterday how it’s trying so hard to reduce e-waste that it’s experimenting with external cases for various components so they’re not just sitting around. They’ve clearly got these batteries sitting on the shelf to order separately — why can’t I just pay the difference?
So I emailed Framework’s CEO. I wasn’t expecting him to reply. But he did, and I never would have guessed there were so many different logistical reasons behind the decision.
Here’s the first part of his reply:
Hi Sean, we kept the 55Wh in the Base configurations for 1[3]th Gen and for Ryzen 7040 Series in order to keep the price low. Despite massive inflation over the last year and increases in costs for just about all materials and components aside from memory and storage over the last year, we were able to hold the pre-built base price to the same as 12th Gen, $1049.
This is both because the 61Wh battery is more expensive, and because our cell supplier has a substantial amount of material prepared for 55Wh. We could either pay to purchase and scrap that material, which would be totally against our mission, or find a productive outlet for it, which we did through the Base SKU.
For offering it as a configuration option, each new variable in the configuration that is part of the core laptop assembly multiplies the amount of inventory and supply chain complexity we need to manage (CPU options * keyboard languages [on pre-built] * DIY vs pre-built * any new configurable option = number of SKUs). Since we are a small team, we focus on keeping the assembled SKUs as few as possible, while enabling configuration on items that are not pre-assembled like OS, memory, storage, Bezel, and Input Cover on DIY Edition and Expansion Cards on all configs. We also keep the Marketplace as an “escape valve” for items that aren’t available pre-configured, like alternate speakers, hinges, displays (e.g. glossy now that we default to matte), and battery.
I replied back:
“I understand the 55Wh inventory problem, and the incentives around core laptop assembly SKUs, but I can’t wrap my head around the DIY edition configurator. If you are putting together a box full of parts for me to assemble, and you have both batteries on the shelf from which you are pulling the parts (as you do, in your marketplace) why would you tell me I can have one of the parts on the shelf, but not the other?”
Here’s Patel again:
The end user assembly process for the DIY Edition now involves installing memory, storage, Operating System, and now also Bezel and Input Cover. The laptops themselves are assembled in high volume in a serial production line at our factory, while the items selected in the DIY Edition are added to the package per-order at the fulfillment warehouse.
We define the factory-assembled vs user-installed items based on a combination of ease of assembly (the reason the WiFi card is now pre-installed and a factor for battery, hinges, Mainboard, speakers and display being pre-installed), impacts on packaging size (the most compact is actually pre-assembling everything like on pre-built configs, which also minimizes the carbon footprint of shipping), and also regulatory reasons. For batteries specifically, batteries assembled in equipment are regulated differently than packing them separately. This is part of the reason replacement batteries weren’t available in the Marketplace for a period of time after we launched.
Ultimately, building any product, and especially one as logistically and operationally complex as a DIY Edition laptop, is about balancing hundreds of different tradeoffs to reach a result that delivers a good user experience, minimizes environmental impact, and is also executionally feasible.
As a consumer, this doesn’t quite satisfy me: I’m still not willing to pay $320 extra for a CPU I don’t need, and I’d feel icky paying $69 for the new battery and then having to figure out what to do with the extra battery pack.
But at least I understand the decision. No matter which SKU you buy, the company sticks the battery and almost every other component into the chassis at the factory and does that in a limited number of ways for efficiency’s sake. To give me the machine I want to buy, the 40-person company would have to change how it assembles laptops or swap batteries after the fact — and right now, the incentives apparently aren’t aligned that way.
Meta’s new hand tracking feature almost feels like touching the future
Meta’s promotional art for Direct Touch. | Image: Meta
Meta is testing what could become a foundational upgrade to its Quest VR headsets: a way to tap and scroll on virtual elements with only your hands, no controllers required. The idea is that you’ll be able to do actions you might already be familiar with from your smartphone, like swiping up and down a page, pressing a button to activate it, or typing on an onscreen keyboard, using just your fingers in the air.
The new experimental feature is called “Direct Touch,” and it’s included with the Quest v50 software update that’s rolling out now. After weeks of waiting, the update finally arrived for me, so, of course, I immediately flipped it on.
When hand tracking is on, the Quest 2 uses its external-facing cameras to follow your hands, and inside the headset, you’ll see them in VR as dark hand-like shadows. (CEO Mark Zuckerberg’s video of Direct Touch, which looks to be taken from a Quest Pro, shows more hand / arm detail.) You can use those shadows to approximate when your hand will “touch” a menu or window in front of you. With Direct Touch, when you make “contact,” things will start to scroll or light up. Scrolling is jerky, but it’s usually more responsive than I thought it would be.
Typing with Direct Touch, however, sucks. When you tap on a part of the UI where you can to input text, the Quest’s onscreen keyboard pops up under the window, and you can “press” individual keys to spell things out. But since there’s no physical place to rest your hands or fingers, it’s hard to have any idea of where — or what — you’re actually typing. (Imagine the lack of feedback you get with the iPad’s onscreen keyboard, and then imagine there’s no glass.) Even when I resort to VR hunt-and-peck to futilely write even a single word, the UI sometimes thinks that I pressed a different key than the one I intended. Fortunately, the keyboard does suggest words as you’re typing, which can help in a pinch.
The bad typing and decent scrolling mean that the Quest web browser is perhaps the best showcase of the Direct Touch controls. If I fudge up the spelling of a web search, the search engine is probably going to fix it. Scrolling up and down works well enough, as does tapping on links. Weirdly, The Verge’s homepage doesn’t scroll past our Top Stories list on the Quest’s browser for some reason, but tapping any one of the six stories I can actually see works better than I expected.
If you’d like to see me actually trying to use the browser, I filmed it for you:
Most other built-in Quest apps that I tried were at least usable with Direct Touch, but many apps from the Quest Store, including Meta’s own Horizon Worlds VR social network, haven’t been updated to work with just your hands. They wouldn’t even open unless I had a controller. I certainly wasn’t expecting apps like Beat Saber to be better when I was controller-free, but I was hoping I’d at least have the option to mess around with them.
Right now, it’s clear why Direct Touch is labeled an experiment. With every mid-air poke, I can’t quite trust that my hand is actually going to “touch” a virtual piece of the Quest’s UI, so using it for longer than a few minutes at a time quickly gets frustrating. Holding out my arms in space just to move around the UI gets tiring after a while, too. Meta’s other controller-free hand gestures, which involve pinching, are generally more reliable, though I find them less intuitive.
That all being said, I still think the idea of Direct Touch is extremely cool. Scrolling and tapping on virtual surfaces in my VR headset makes me feel like I’m living out some kind of sci-fi dream, even if my words-per-minute plummets by 99 percent and I don’t think that any of my taps will work the way I expect. When Direct Touch works as intended, using my hands is also way more convenient than using the Quest’s controllers. I know that’s a major asterisk, but just popping on the headset and scrolling through something with my hands removes a lot of friction I normally associate with putting on the Quest. (That said, because Direct Touch is so finicky, I have to make sure the controllers are nearby anyway.)
It’s also obvious to see where this technology could go, especially if Meta’s still-years-away AR glasses actually come to fruition. While wearing those glasses out in the world, you probably won’t want to also have a controller or two when you could just use your hands. And we may not just be working with Meta devices with our hands in the air; Apple’s long-rumored mixed reality headset may let users type on onscreen keyboards, so it seems possible that Apple is exploring these sorts of interactions as well.
For now, I’m largely going to stick with using the Quest’s controllers. But if I just need to check something quickly on my headset, I may leave the controllers on the table and try to accomplish it with my hands instead. It might take three times as long, but it’s a heck of a lot cooler.
A first look at using iMessage from a PC with Microsoft’s Phone Link app
Image: Microsoft
Microsoft is gradually rolling out an updated Phone Link app that finally lets you couple an iPhone to a Windows PC. I got access to the new Phone Link version yesterday and immediately paired my iPhone 14 Pro with my PC to send and receive messages via iMessage, make calls, and see the notifications from my phone alongside my usual PC ones.
Android users have been able to do all of this this and much more with Phone Link for years, but iPhone users like myself have had to sit by and watch on with envy. The new Phone Link update for iOS is very basic though and literally only supports making and receiving calls, sending and receiving messages to single contacts and not groups (via iMessage), and viewing and dismissing notifications. You can’t do any fancy stuff like running phone apps on your PC or mirroring your phone’s display.
Screenshot by Tom Warren / The Verge
Sending and receiving messages via iMessage on a Windows PC with Phone Link.
The setup process between iPhone and PC is simple. Phone Link prompts you to scan a QR code from your iPhone to link it to Windows, which automatically opens a lightweight App Clip version of Phone Link on iOS to complete the Bluetooth pairing. Once paired, you have to take some important steps to enable contact sharing over Bluetooth, enable “show notifications,” and allow system notifications to be shared to your PC over Bluetooth. These settings are all available in the Bluetooth options for the device you paired to your iPhone.
When you receive a message that was sent via iMessage it will appear in Phone Link and you can reply and it will also be sent via iMessage so those all-important blue bubbles don’t get broken. But the experience isn’t ideal. You don’t get a full message history here, which means you’ll only see messages from when your PC was on and paired to your iPhone. Notifications for messages also still appear on your phone, so you might get done messaging someone and still see a notification for a message you’ve already read on your PC.
Screenshot by Tom Warren / The Verge
Notifications from your iPhone on Windows.
Every time I reboot my PC or close the Phone Link app, the history is fully wiped. So this is only good as a backup to send and receive messages while you’re at your PC. If you message a lot of people through iMessage then you’ll have to remember the conversations you were having before sending messages here. That’s a bad user experience for Phone Link, but unfortunately it’s an Apple restriction that Microsoft has no control over.
Microsoft’s Phone Link works by sending messages over Bluetooth to contacts. Apple’s iOS then intercepts these messages and forces them to be sent over iMessage, much like how it will always automatically detect when you’re sending a message to an iPhone and immediately switch it to blue bubbles and not the green ones sent via regular SMS. Phone Link intercepts the messages you receive through Bluetooth notifications and then shows these in the client on Windows.
Screenshot by Tom Warren / The Verge
You get a full call history with Phone Link.
It’s all a neat workaround but the limitations also mean you can’t use this for group conversations. You’ll only be able to send and receive messages to individuals. As someone who doesn’t live in the US, I barely use iMessage so this is just a useful way to intercept delivery messages or when someone forgets to send a message via WhatsApp. But for people who rely on iMessage every day, I think the lack of message history will be very irritating.
Elsewhere, calling works just as you’d expect. I can now use my XLR microphone to speak to people, and answer calls on my PC without touching my iPhone. That’s a neat upgrade, even if Bluetooth does add a tiny bit of latency to calls. You can also choose to transfer a call back to your iPhone if you want to leave your PC, or simply pick up your phone and switch the call options there.
Screenshot by Tom Warren / The Verge
You can easily transfer calls between an iPhone and a Windows PC.
I’m also really enjoying seeing my phone notifications from my PC. There have been plenty of times where I’ve missed important notifications because I’m busy working on my PC, or I finish up work and have to clear through a ton of notifications on my phone. Now I can just manage them as they come in, and if I clear any on my PC that’s immediately cleared on my phone too. You can also mute notifications from certain phone apps from showing up on your PC, but they’ll still show just fine on your iPhone.
One thing I’d like to see in Phone Link is photos integration. Microsoft already offers iCloud Photos integration right inside the Windows 11 Photos app, so it would be great to see this extend to here eventually.
Microsoft is still rolling out this new Phone Link app to Windows Insiders in the Dev, Beta, and Release Preview channels. Once testing is complete, all Windows 11 users should get access to the updated app in the coming months.
What to bring on your next 2,600-mile walk
Imagine this but around 10 times grander.
Hiking the Pacific Crest Trail or anything like it takes a lot of research and gear. So what would a research and weight-obsessive tech writer bring?
It’s that time of year again. Winter, in the places it actually exists, is slowly starting to turn into spring, and it feels like the time to start making summer plans. For lots of people, that means heading outside to do some hiking.
Personally, I’m planning on doing a bit of that myself: over the next few months I, and thousands of other people, will be attempting to walk from Mexico to Canada on the Pacific Crest Trail, which spans around 2,650 miles through California, Oregon, and Washington. There’ll also be people doing a similar journey in different places, such as the Appalachian Trail on the East Coast, the Continental Divide Trail through the Rockies, or any number of slightly shorter regional hikes like the Florida, Colorado, or Pacific Northwest trails.
I’m sure everyone reading right now would absolutely love spending four to six months in the wilderness, walking upward of 25 miles a day over steep terrain. But doing so requires a lot of equipment, and it can be hard to know what to bring or where to even start researching.
Hikers attempting to “thru-hike” a trail need to pack the gear necessary to stay alive — shelter, appropriate clothing, ways to cook food and protect it from animals — and know how to use it. Poor planning can lead to a miserable experience on the trail that could prematurely end someone’s hike or even put their life in danger if things go really wrong. And while good planning doesn’t guarantee that you’ll finish the entire trail — statistically, most people who set out to do a thru hike don’t succeed (I’m built different though, surely) — it sets you up to have an enjoyable and relatively safe experience, no matter how far you make it.
And besides, even if you’re not looking to actually hike the trail yourself, who doesn’t love a good gear post?
This is more or less everything I’ll be living with for the next few months — check the alt text for a full list.
As a note, while this list is just so long, it’s not necessarily 100 percent complete. It has all the important things, and I bought the specific gear I mention and link to based on research I’ve been doing over the past four years. But while I’ve hiked hundreds of miles with it already, I wouldn’t say that anyone should replicate my setup exactly. What you take on a hike like this is a deeply personal decision, and you should probably take a look at several lists before deciding on gear for yourself.
Plus, at roughly 11 pounds, my pack is way too heavy for the true ultralight purists, and it omits some comfort items — a pillow, camp shoes, sleep clothes, and a midlayer / fleece, to name a few — that more traditional backpackers would consider essential. The truest compromise is the one where everyone makes fun of you.
By the way, if you want a TL;DR list of the stuff I’m taking with no extra info, you can check out this site called LighterPack. (Yes, pretty much every enthusiast community has its own special site for creating databases; it’s just how nerds roll, even outdoorsy ones.) You can also listen to me chat about the PCT with my colleague David Pierce on The Vergecast, if you’re into that sort of thing.
With that out of the way, let’s get started:
Tech
Of course this had to come first; this is The Verge after all. I’m planning on almost entirely disconnecting from the internet at large during my hike, but my friends and family would prefer to hear from me every once in a while — and would also like me to have digital maps and a way to contact emergency services if something goes wrong.
To that last point, I’m bringing the Garmin InReach Mini, a satellite communicator that lets me text and get weather forecasts during the very frequent stretches without cell service on the trail. It also lets my family track my hike in near real time because it’s logging my position every few minutes and sending it up to the satellites. With reasonable tracking settings and relatively light texting, it’ll last around five days between charges.
I’m also, obviously, bringing a smartphone; we don’t need to talk about which one here because it would be a whole thing. I’ve been told by PCT alumni that you can usually only expect to run into cell service once or twice throughout the day, so for the most part, it’ll be an offline source for maps, podcasts, and music. Plus, it’s good to have a phone when you’re in town and can use Google Maps to find grocery stores and hotels.
There are a few apps that I consider vital, even though I know people have hiked the trail decades before they were available. First and foremost is an app called FarOut, which acts as a map for the PCT, pointing out landmarks, campsites, water sources, and more, as well as a sort of thru-hiker bulletin board. People can leave comments on waypoints saying things like “this water source has dried up, use the next one in four miles” or “this campsite / hostel has ants, stay away.”
Writing even a single sentence with this system takes so much effort.
There’s also the InReach’s companion app, which lets me text without having to use the actual device’s terrible typing experience, Pocket Casts for on-trail podcast listening, Seek for identifying plants, and PeakFinder for identifying mountains.
Another thing I’ve decided to bring is a Canon G7X Mark II, a point-and-shoot with a largish sensor. I like the pictures that come out of it way better than any phone camera I’ve seen, and I don’t think any software tricks or periscope lenses are going to hold a candle to a physical 24–120mm-equivalent zoom lens. Given that this hike is probably a once-in-a-lifetime experience, I want to make sure that I won’t be distracted by crappy night mode or overdone HDR if I look back at pictures from it in 10 or 20 years. I’m also bringing a tiny tripod that I’m pretty sure could double as a tent stake in an emergency.
Keeping all that powered in the multiday stretches between towns will be a Nitecore NB20000 powerbank. As its name implies, it has a 20,000mAh capacity, which should charge my phone around five times. (Given how little I’ll be using it, that’s probably around a week’s worth of charging — or more if I stretch it.)
The Anker charger will take up a single power socket — and when hikers congregate, those can be scarce. Also, yes, unfortunately that is a Micro USB cable. The Garmin and flashlight use it.
It also has a few features that other comparable chargers don’t have. For one, it’s made out of carbon fiber, which keeps the weight down. It also does passthrough charging, so when I get to town, I can plug it and my phone into my two-port Anker power brick, then plug my InReach into the battery, and all three devices will charge up at the same time.
Most of this stuff will live in a ziplock bag placed in another waterproof bag because I don’t want to take any chances with rain and river crossings.
A backpack made of recycled materials
Having a good backpack is essential for backpacking (duh), so for the PCT, I’ve gone with one that’s both simple and lightweight while still being durable enough to last a few thousand miles.
Part of what makes my pack of choice, the Waymark Thru 40 UL, fit for the task comes down to what it’s actually made of. The main body is sewn from a material called Ecopak. According to the company that makes the fabric, Challenge Sailcloth, it’s made of polyester and film that’s 100 percent recycled from water bottles. It also happens to be water resistant, so it should keep all my stuff dry (though I do put my most critical pieces of gear into a plastic liner just in case water manages to soak through the seams). There’s a reason Ecopak and the similar Ultra fabric have gotten so popular with small backpack companies.
One of my favorite features of this backpack is the big stretchy pocket at the front — that bad boy can fit so many various items.
The pack itself is basically just one giant pocket: a tube made out of Ecopak to shove things into. All you get in terms of organization are two open pockets on the side (I keep water bottles in them) and a mesh pocket on the back, which is where I store a variety of things, like my electronics bag and wind pants. Oh, and there are loops to hold an ice axe and trekking poles when you’re not actively using them. I’ve also added two pockets to the shoulder straps. One’s for an easy-to-access water bottle, and I’ll put my phone, earbuds, chapstick, and other miscellaneous things in the other.
Overall, it has around 40L of carrying capacity. Unfortunately, you can’t buy this exact pack anymore. Right after I got mine, Waymark updated the Thru to add an internal frame and what appears to be a nonremovable padded hipbelt. While those changes definitely make the pack more comfortable when you’re carrying a heavy load, they also made it a full 10 ounces heavier. I’m happy I got mine when I did, though I do wonder if frameless 40L packs seem to be going out of style for a reason. (You can still get them if you look hard enough — Atom Packs and LiteAF have some options.)
A place to sleep
Unless you’re a hardcore backpacker, you may be surprised to learn that some people don’t even use tents, opting instead for an ultralightweight tarp that leaves them mostly open to the world, while still protecting them from wind and rain.
Home away from home.
That ain’t me, though — I want to be protected from bugs and mountain lions (and I don’t want to hear your opinions on how much a tent would do to stop a hungry animal). So I’m bringing the Zpacks Duplex, a two-person tent that sets up using trekking poles rather than requiring its own set of poles that you have to carry around in your backpack.
The reason I went with a two-person tent, even though I’m relatively weight conscious, is that it’s only around 200 grams heavier than Zpacks’ lightest one-person tent, and it comfortably fits me, my inflatable sleeping pad, and my backpack. That means that, if it rains, I won’t have to be worried about keeping all my gear dry.
It’s also made of a high-tech fabric called Dyneema Composite Fabric (DCF), which has the benefit of being both extremely lightweight and exceptionally water resistant, especially compared to traditional nylon or polyester tents. (In principle, it’s kind of similar to Ecopak, but it’s significantly lighter.) If you look into DCF at all, you’ll probably see claims about it being “the world’s strongest fiber,” but realistically, the biggest draw is that it weighs next to nothing and is generally durable enough to withstand the conditions you’d encounter on a thru hike. Sure, there are claims that it’s stronger than steel, but there’s more to durability than how hard you can pull on a material before it rips — and there’s probably a reason that mountaineering tents generally use heavier-weight fabrics. For my purposes, though, it’s good enough.
So if the Duplex and othertentslikeit are so great, why doesn’t everyone use them? It’s exactly the reason you might expect: cost (and also maybe concerns about condensation). Zpacks charges $699 for just the tent — you still have to buy trekking poles and eight (!!!) stakes. The company also says it’s built to last for “at least one full 2500-plus mile thru hike.” So yes, if I wanted to do another one of these, there’s a very real possibility I’d have to buy a whole new tent.
But man... 581 grams is tough to argue with, especially when a two-person tent that’s made with more traditional materials and that uses standalone poles can weigh over a kilogram. Heck, the Duplex is lighter than my old one-person tent and handles rain significantly better. Also, according to Halfway Anywhere’s survey of PCT hikers, basically everyone else uses this tent, so I have to use it if I want to fit in with the cool kids.
In colder weather, I’d be extremely bundled... but I hiked up a very long and steep hill before taking this picture and didn’t feel like fully immersing myself in my very warm quilt.
Stuff to sleep on
When it comes to sleeping gear, the most important piece is my down quilt that’s rated for 10 degrees Fahrenheit (desert nights can be cold, especially in April). The difference between a quilt and a traditional sleeping bag is that there’s no back to it, which makes it a lot lighter. Instead, you use a sleeping pad to keep your warmth from seeping into the ground and strap the quilt onto it to prevent drafts.
My sleeping pad is an inflatable one from Thermarest, even though it means I’ll have to spend three minutes every night blowing into a valve. Its high insulation value is one reason I picked it, but I also love how (relatively) comfy it is. I’ve used both a traditional foldable foam pad as well as a barely even there one-eighth-inch-thick one cut to torso length, and it’s hard to imagine wanting to use either for 120 nights or more.
I will, however, be bringing the ultrathin foam pad to sit on when I take a break or to take naps on after lunch.
Clothes for every condition
Photo: Moritz Bögli
My thru-hiking outfit after 10 days on the Tahoe Rim Trail.
Choosing clothes for backpacking is tough — on a trip as long as the PCT, you’re likely to run into wind, snow, rain, scorching sun, and everything in between, but you can’t bring a bunch of outfits for each condition. That’s why layering is super important.
My everyday hiking uniform is a pair of shorts, a sun hoodie, a hat, and a pair of weird toe socks to prevent blisters. (The shirt and shorts I’m only bringing one each of; the ones I’ll be wearing. I am bringing two pairs of socks, though.) I’ll also have a Buff, and a pair of sun gloves.
If I need extra warmth, I have a pullover jacket and a pair of gloves that live in its kangaroo pocket. The synthetic Climashield Apex insulation in the jacket doesn’t compress as well as down, but it will still keep me warm if it gets wet.
Speaking of, I also have a cheap rain jacket. After a few years of adventures, I’d say it’s only waterproof-ish, and it’s not breathable like more expensive jackets, but I’m not expecting a ton of rainy days. That’s why I’m not bringing any rain pants, though I am bringing wind pants, which should be helpful for staying warm in super breezy conditions and at night. They also make me look like a trash bag with legs, so that’s fun.
Also, a note on laundry: you might think that hiking all day in the summer heat would make your clothes dirty and smelly. And you would be correct. You just stop noticing it after a while because pretty much the only way they get cleaned is when you hop in a lake for a swim or stop in a town that happens to have laundry facilities. (Yes, a motel room sink counts as a laundry facility.)
Lots of shoes
I use the boots for working on trails and the trail runners for hiking them.
Okay, I’ll only have one pair of shoes with me at any given time, but I know for sure that I’ll wear through five or six pairs throughout the hike. I use trail runners (and ones that have a reputation for being kind of fragile) because I find them to be so much more comfortable and lightweight than traditional hiking boots. Sure, a hardcore pair of boots could last the entire trail, but I’d hate walking in them so much that I’d quit before durability would become a factor.
Trail runners also usually dry a lot faster. Whenever anyone asks me for hiking footwear recommendations, I explicitly tell them not to get “waterproof” shoes. My reasoning is that their feet are probably going to get wet anyways. Even if they’re not wading through treacherous rivers like I will be, feet tend to sweat when you’re hiking. Most waterproof shoes are going to trap that moisture, keeping your socks soaked. And sure, that may happen with my shoes, too, but if I take them off for 30 minutes, they’ll completely dry out. That hasn’t been my experience with even the fanciest of waterproof materials.
I’ll also be wearing a pair of hiking gaiters, which hook onto your shoes and help keep rocks and sand out.
My last note on shoes is that there absolutely are people who would disagree with me and who love their waterproof boots. And if that’s you, absolutely more power to you — the great thing is that everybody can choose what works for them, and they shouldn’t be judged for doing so.
Food
While some people ship themselves food in mailboxes, I’m planning to resupply on the trail. That means I’ll be hitchhiking into towns along the way, finding a grocery or convenience store, and stocking up on enough food to get me through a full week of hiking. While what I eat will be limited by what’s available (and what I haven’t gotten burnt out on), there are still a lot of things I have to consider while shopping:
My kitchen supplies are as follows: a small gas canister stove, a metal spork, and a 600mL titanium mug / cookpot. If something can’t be cooked in that, I can’t cook it. (Campfires are forbidden in most places on the PCT.) Ramen and instant mashed potatoes fit the bill nicely.
I prefer not to cook for breakfast and lunch, so things like bagels and peanut butter or wraps with vegetables are great.
There is no refrigeration on the trail.
I have to carry days’ worth of food on my back, so it has to be lightweight and relatively compact. I will make an exception to the compact rule for potato chips.
Generally, you need around 5,000 calories when you’re hiking all day. You do not want to come up short.
I will eat as many candy bars, snack cakes, and packages of skittles as I want. (Apologies to my dentist and also my mom.)
Also, a note on water: I’ll be drinking out of rivers, streams, ponds, and the like, all of which can have some nasty stuff in them that’ll make me sick. To keep that from happening, I’ll be filtering it through a Sawyer Squeeze, which gets rid of bacteria and protozoa.
I got this water from a random stream in Nevada. The filter helpfully also removes all the dirt and sediment.
A bear can
For most of the PCT, it’s fine to keep your food in a regular bag, but there are several sections where you’re required to carry a bear can — a big plastic container that animals can’t get into or break open. Part of the reason is that you don’t want to wake up and discover that a bear ate your food, but it also protects the wildlife, too. If you leave food in a regular bag and a bear gets to it, it’s going to keep harassing hikers because it now associates them with eating. And a bear that becomes a nuisance or danger to humans is not going to survive very long.
Now that the Desolation Wilderness also requires bear cans, I plan on using my BearVault BV 500 from Kennedy Meadows South (the start of the Sierra Nevada section on the PCT) to Tahoe City or Truckee — about a 450-mile stretch that could take anywhere from 20 days to a month and a half to hike. It’s heavy and bulky, but given how hard it may be to resupply in the mountains this year, I don’t think my smaller BV450 will hold enough food.
Snow gear
Getting traction is key in the snow — though I’ll admit, the conditions pictured here aren’t nearly bad enough to require the ice ax.
I will almost certainly have to deal with an epic (and perhaps historic?) amount of snow this year, especially in the Sierras. This raises the obvious concern of slipping on snow and falling, which could lead to serious injury or even death.
To help prevent such inconveniences, I’ll be carrying trail crampons to help prevent me from falling and a lightweight ice ax in case I do fall and need to stop myself.
There’s no piece of gear that’ll make up for good technique and common sense in the mountains. As a citizen of the north, I know that walking on snow is easier in the mornings because the summer sun hasn’t softened it up yet — I also know that an ice ax won’t be much help if all it has to grab onto is powder or slush. Likewise, it’s not going to stop me from sliding down a mountain if it’s on my backpack rather than in my hand.
There’s only so far that knowledge can get you, though. I’m not an experienced mountaineer, so if things are still super gnarly by the time I reach the Sierras, I won’t hesitate to change my plans and temporarily skip them.
Okay, let’s talk about going to the bathroom in the woods
Here’s the deal: I’ll try to be as mature as possible about this if y’all promise to do the same. But yes, going miles and miles into the wilderness means giving up on wonderful man-made toilets and sewer systems that keep waste away from water and food sources.
The rules for peeing are pretty easy: do it as far away from water sources as you can, and you’ll be alright. Pooping, however, requires a bit more planning — and how you have to do it may depend on where you are. The rules are not the same everywhere, so always make sure to check what the local best practices are before you head out. With that said, for most of the PCT, the best practice is to bury your poop in a hole that’s at least six inches deep and that’s 200 feet away from campsites, the trail, or water sources.
Carry a trowel because there are very few port-a-potties in the backcountry.
Digging that hole is a lot easier if you have a trowel; personally, I use this super light one made of aluminum but with duct tape wrapped around the handle to keep it from digging into my hands.
While you’re supposed to bury your waste, you’re not supposed to leave toilet paper behind. That — you have to pack out with you, usually double-bagged. If you think that keeping used toilet paper in your backpack sounds gross, I absolutely agree. That’s why my bathroom kit also includes a little gadget that turns a water bottle into a bidet. Yes, it did require a fair amount of practice to use effectively, but I’m very glad I took the time to learn. I do still keep a little bit of TP in my bag just in case.
One last note on bodily functions: I don’t have any firsthand experience with it, but I’ve heard plenty of people say that dealing with menstruation on the trail is a lot easier if you use something like a DivaCup. (Of course, I’ve also heard from a few people who prefer the traditional pads and tampons.) Either way, the steps for dealing with the blood and other discharge are the same as you would with poop — you can empty a menstrual cup into a hole that you dug or pack out any used sanitary products in a bag.
And it goes without saying, but you must use hand sanitizer after doing anything from this section. Being in the wild is no excuse for poor hygiene.
Miscellaneous
Not everything is going to fit into neat categories, so here are a few other important things I’m bringing, in no particular order.
A first-aid kit — I won’t tell you what your first-aid kit should or should not include because I don’t want that kind of liability. I will only say that Imodium or some other antidiarrheal medication is a good idea if you’re going to be in places where water and food are scarce.
A small thermometer — if my water filter freezes, it’s no longer safe to use. So if the temperature snaps below freezing and I wasn’t keeping the filter in my quilt with me, I need to know.
A fanny pack — because fashion is important (also because I want a convenient place to put my camera, wallet, and permit)
What I’m not bringing
I know it sounds like I’m bringing a lot, but remember that it all fits in a 40L backpack. I won’t be bringing any extras or duplicates of anything. If my shoes, tent, or anything else breaks, I’ll have to repair it well enough to get to the next town. (My first aid kit includes a needle that can be combined with dental floss to make a pretty nifty sewing kit.)
There are also a few comfort items I’m leaving behind. The most notable is a pillow, but I’m also not bringing a backpacking chair or anything. While the latter is a relatively popular item for weekend backpacking, most thru-hikers don’t take them because they spend significantly more time hiking than they will at camp.
Finally, the last thing I’m not bringing: friends. One of the questions I’ve been asked the most when I tell people about this hike is, “So wait, are you doing this alone?” The answer is yes and no. While I’m not starting with anyone, I’m almost certain I’ll meet people along the way.
There’s a common saying in the hiking community that “the trail provides,” which is usually meant to reassure people that they’ll be able to find what they’re looking for, be it friendship, food, or a reason to keep hiking another day. I don’t really agree with that. In my experience, the only things the trail itself pro vides are some admittedly grand views, along with endless hills to climb. However, the trail community — the people hiking with you, and who live nearby and offer rides, meals, and even places to stay to hundreds of people each year — does absolutely provide. I don’t need to bring a friend because I know I’ll make so many along the way.
Also, I couldn’t find anyone mad enough to do it with me.
Bard Fork, and How to Talk So Chatbots Will Listen Google has unleashed its A.I. chatbot, Bard, to the world. And Spotify’s A.I. D.J. knows your taste — perhaps a little too well.
TikTok CEO grilled for over five hours on China, drugs and teen mental health
Shou Zi Chew attempts to play down concerns over data and privacy as lawmakers call for ban on Chinese-owned app
The chief executive of TikTok, Shou Zi Chew, was forced to defend his company’s relationship with China, as well as the protections for its youngest users, at a testy congressional hearing on Thursday that came amid a bipartisan push to ban the app entirely in the US over national security concerns.
The hearing marked the first ever appearance before US lawmakers by a TikTok chief executive, and a rare public outing for the 4o-year-old Chew, who has remained largely out of the limelight as the social network’s popularity soars. TikTok now boasts tens of millions of US users, but lawmakers have long held concerns over China’s control over the app, which Chew repeatedly tried to assuage throughout the hearing. “Let me state this unequivocally: ByteDance is not an agent of China or any other country,” Chew said in Thursday’s testimony.
PayPal’s bringing its passkey logins to Android
Image: PayPal
Android users should soon be able to log in to PayPal’s website using passkeys, the password-free login system that’s being pushed by Apple, Google, Microsoft, the FIDO alliance, and more. According to an announcement post, the feature is currently rolling out, and will be “more widely available over the coming year.”
PayPal says that the rollout will start on its website, rather than its app, and that you have to be running Chrome on Android 9 or up to access passkeys. If it’s available for your account, you may get a prompt asking if you want to create a passkey, which you can authenticate using the biometric system or passcode that you use to unlock your phone.
Passkeys are based on FIDO authentication standards, and are generally cross-platform compatible — though as PayPal shows, you may have to wait for a site or service to roll out support on every platform you use. Several password managers, including the ones built into iOS and Android, support syncing passkeys between devices, and there are ways to access them when you’re using a device that they’re not synced to as well.
Despite several big tech companies pitching passkeys as the key (no pun intended) to the passwordless future, they’re still relatively rare. 1Password has a page that keeps track of what sites and services support them, and while it does have some big names like Best Buy, Okta, Microsoft, and eBay, there’s still only 38 entries on the list. Even if there are actually double the number of sites that support passkeys, you’d still be pretty hard-pressed to ditch passwords for good at this point.
Using a passkey with PayPal won’t remove the password from your account, since you’ll still need that to log in on unsupported devices. (While PayPal rolled out passkey support for Apple devices last year, the company’s documentation says the feature isn’t available on Windows yet.)
Biden’s Options on TikTok Narrow After China Pushes Back China’s opposition to a sale of the app leaves the president to challenge that stand or consider seeking a ban, which would face its own obstacles.
How to Set Up and Use an eSIM for International Travel The digital version of the SIM card, included on many newer phones, is set to become prevalent. It also offers affordable cellular data abroad.
Three things with Caitlin Stasey: ‘Keep this interview far away from my girlfriend’
In our weekly interview about objects, the actor tells us the drastic way she curbs her screen time and the confession she doesn’t want her partner to see
Caitlin Stasey has a very honest endorsement for her latest project, the new eight-part survival comedy Class Of ’07: “I love the cast – and I wouldn’t say it if I didn’t, because I’m not very good at pretending to like people.”
Stasey has starred in Australian favourites Neighbours and Please Like Me, as well as Hollywood box office hits like the horror flick Smile. But not every TV show or movie works out as well as Class of ’07.
Relativity Space’s 3-D Printed Rocket Fails Just After Launch Relativity Space, a private company with ambitions for sending people to Mars, made it off the launchpad, but the vehicle experienced problems during the second stage of its flight.
Samsung’s photo “remaster” knows what this baby pic is missing: teeth
Dentists hate this one easy trick. | Illustration by Alex Castro / The Verge
Samsung’s recently caught some flak after widespread reports that its camera software fakes zoom pictures of the moon, but things may be about to get way more unsettling. A Verge reader wrote in on Wednesday to tell us that the company’s software is adding teeth to pictures of their seven-month old daughter.
This reader says they recently got an S23 Ultra, and decided to try out the Remaster feature in Samsung’s photo-viewing app, Gallery. (It’s the default photo app for the phone, and the feature is available inside the camera if you visit your photo roll.)
They expected something like what Google Photos does, suggesting specific adjustments and filters, unbluring pictures, and the like. Instead, they got the results you can see below, with the original image on the left and the “Remastered” one on the right.
So... this is some nightmare fuel. Sure, it erases some unsightly snot (can’t have the world thinking that this baby isn’t ready for its close-up 100 percent of the time), but it also appears to look at the baby’s tongue and immediately jump to “I know what that should look like: a nice row of fully-grown teeth!”
The reader also sent us a video of the Remaster feature turning their daughter’s tongue into teeth in another picture, which makes it seem like it’s not just a one-off glitch.
Image: @earcity on Twitter
This example is definitely more subtle, which kind of makes it worse?
I wasn’t able to reproduce these teething issues myself, using the same version of the Gallery app on a regular S22. I tried remastering half a dozen photos of babies (and even a screenshot from the updated, less-toothy Sonic trailer ) and never saw anything like what this user got. I also wasn’t able to find any other people reporting this type of issue, so it’s impossible to say for sure what’s going on.
We reached out to Samsung for comment but didn’t immediately receive a response.
Samsung’s website says the Remastering feature “removes shadows and reflections automatically to make your pictures look great.” Unlike Samsung’s explanation of the Scene Optimizer feature that added details to the moon, Samsung’s description of the Remaster feature doesn’t even including any handwaving about “AI” or “deep-learning.” It doesn’t even really sound like the beautification filters that we’ve seen on phones for years, with teeth-whitening filters that could maybe, possibly, misfire in such an upsetting way. Based on what Samsung wrote, I’d basically expect it to just tweak my exposure settings, similar to Google Photos’ “Enhance” feature.
So where are the teeth coming from?
The reader described the resulting picture as “far more disturbing than a faked moonshot if you ask me,” and I somewhat agree — the altered moon pictures just look like slightly better pictures of the moon, whereas this is the embodiment of the unsettling teeth tweet.
However, I will say that there is a difference in context here. The moon fakery happens automatically in the camera app if you have a certain feature on. Here, you still have to explicitly ask for a remaster (which you have the option of discarding, leaving the original intact). The moon story sparked discussions about what exactly it means to take a photograph, whereas this is mostly just a story about an editing feature taking a much-too-agressive bite. If Samsung was using AI to yassify babies or give them teeth straight out of the camera we’d be having a very different conversation here, but for now, that’s not what’s happening. But I still hate looking at it.
/cdn.vox-cdn.com/uploads/chorus_asset/file/24477151/236555_Amazfit_Band_7_AKrales_0124.jpg)
/cdn.vox-cdn.com/uploads/chorus_asset/file/24477142/236555_Amazfit_Band_7_AKrales_0026.jpg)
/cdn.vox-cdn.com/uploads/chorus_asset/file/24477150/236555_Amazfit_Band_7_AKrales_0113.jpg)
/cdn.vox-cdn.com/uploads/chorus_asset/file/24477149/236555_Amazfit_Band_7_AKrales_0101.jpg)
/cdn.vox-cdn.com/uploads/chorus_asset/file/24477145/236555_Amazfit_Band_7_AKrales_0064.jpg)
/cdn.vox-cdn.com/uploads/chorus_asset/file/24477147/236555_Amazfit_Band_7_AKrales_0078.jpg)
/cdn.vox-cdn.com/uploads/chorus_asset/file/24477141/236555_Amazfit_Band_7_AKrales_0018.jpg) Photo by Amelia Holowaty Krales / The Verge
Photo by Amelia Holowaty Krales / The Verge

/cdn.vox-cdn.com/uploads/chorus_asset/file/24535211/framework_configurator.jpg) Screenshot by Sean Hollister / The Verge
Screenshot by Sean Hollister / The Verge


/cdn.vox-cdn.com/uploads/chorus_asset/file/24533253/phonelink.jpg) Screenshot by Tom Warren / The Verge
Screenshot by Tom Warren / The Verge
/cdn.vox-cdn.com/uploads/chorus_asset/file/24533254/phonelink2.jpg) Screenshot by Tom Warren / The Verge
Screenshot by Tom Warren / The Verge
/cdn.vox-cdn.com/uploads/chorus_asset/file/24533255/phonelink3.jpg) Screenshot by Tom Warren / The Verge
Screenshot by Tom Warren / The Verge
/cdn.vox-cdn.com/uploads/chorus_asset/file/24533256/phonelink4.jpg) Screenshot by Tom Warren / The Verge
Screenshot by Tom Warren / The Verge

/cdn.vox-cdn.com/uploads/chorus_asset/file/24524076/IMG_9119.jpg)
/cdn.vox-cdn.com/uploads/chorus_asset/file/24520178/ezgif_2_d6c8c826d5.gif)
/cdn.vox-cdn.com/uploads/chorus_asset/file/24523923/DSCF2377.jpg)
/cdn.vox-cdn.com/uploads/chorus_asset/file/24520042/Packpics.jpg)
/cdn.vox-cdn.com/uploads/chorus_asset/file/24520012/IMG_9098.jpg)
/cdn.vox-cdn.com/uploads/chorus_asset/file/24520008/IMG_9102.jpg)
/cdn.vox-cdn.com/uploads/chorus_asset/file/24516979/IMG_0426.jpeg) Photo: Moritz Bögli
Photo: Moritz Bögli
/cdn.vox-cdn.com/uploads/chorus_asset/file/24524066/IMG_9112.jpg)
/cdn.vox-cdn.com/uploads/chorus_asset/file/24520051/IMG_5267.jpg)
/cdn.vox-cdn.com/uploads/chorus_asset/file/24520033/IMG_9107.jpg)
/cdn.vox-cdn.com/uploads/chorus_asset/file/24525706/IMG_9132.jpg)


/cdn.vox-cdn.com/uploads/chorus_asset/file/24529546/ezgif_5_f5865d23b8.gif) Image: @earcity on Twitter
Image: @earcity on Twitter


